All it takes is 12 steps to get you running with a bootable USB drive. If you’d like to go straight to the instructions for the Bootable USB drive, click here.
This past weekend I spent some time playing around with Linux Mint 12. Last week, Linux Mint’s approach to the Gnome2-Gnome3-Unity fiasco was highlighted multiple times on slashdot.org. Linux Mint seeks to blend the aspects of these desktop environments into something that people actually want. They’ve given you the choice of which version of Gnome to run, and subsequently, the choice of which way you want to use your desktop environment: application-centered or task-centered. Anyway, it was a pleasant experience to fiddle with the ‘Lisa’ release candidate.
Sidebar: I find the use of the Lisa codename delightfully tantalizing. It makes me ask so many questions. Originally, the Lisa computer - for those of you who don't know your Apple history - was meant to be a computer that revolutionized the way computers were used. What's even more titillating is that the Lisa was so special because of its Graphical User Interface (GUI). The very thing that Linux Mint 12 is trying to "fix" is the GUI. So, whether the codename Lisa is an allusion to the old "new kind of human-computer interface", a tribute to the late Steve Jobs, both, or something totally unrelated, I'm very excited about Linux Mint 12 and what it's trying to accomplish.
Without further commentary:
How to Create a Linux Mint 12 Bootable USB Drive
I based my exploration of creating a bootable USB drive on this post about Linux Mint 11, the process is essentially the same. I didn’t have any luck with the Startup Disk Creator, though, so I went with UNetbootin. Additionally, you don’t need to edit any configuration files with the below process.
- Download UNetbootin
- Grab one of the CD releases from Linux Mint.
- Insert your USB drive
- Erase everything on your USB drive or format the USB drive
- Open UNetbootin
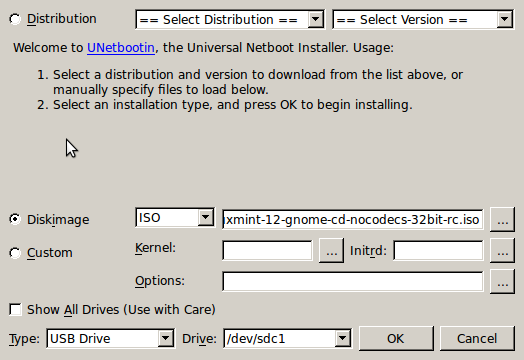
- Select the Diskimage option, the ISO option and insert the path to the iso you downloaded.
- Select the Type of drive (USB) to which you’re writing and enter the path to that drive
- Click OK
- Insert the USB drive into the computer you’d like to boot into Linux Mint 12
- Restart the computer with the USB drive inserted
- Hit Enter or Wait…
- Select ‘Start Linux Mint’
You can get it from it’s homepage on sourceforge or if you run Ubuntu or Linux Mint as your OS, run this command:
$ sudo apt-get install unetbootin
I used the 32-bit iso without codecs, so that’s the only release for which I can vouch.

UNetbootin screenshot
See above image. Note: your path may be different.
UNetbootin should create your bootable USB drive for you!
If your computer’s boot order isn’t set to start with USB, you’ll have to enter the boot menu. This is usually done by hitting the F12 key as soon as the computer starts and before the ‘Starting Windows…’ screen or any other screen shows.
If you’ve successfully booted from the USB drive, you’ll likely get a prompt that looks like this:
SYSLINUX 3.63 Debian-2008-07-15 EBIOS Copyright (C) 1994-2008 H. Peter Anvin

boot:
You can simply hit enter, and that will trigger the UNetbootin menu. If you don’t do anything, within 30 seconds UNetbootin will take over and give you a menu for selecting which item on the USB drive to boot.
Ta da! That’s it


15 Responses
Here’s a weird question … I’ve tried several types of Live distros with Gnome 3, Unity and now Linmux Mint 12 and they all come up with only one refresh rate on the monitor, 60Hz.
Cain’t look at it very long before my eyes start hurtin’.
Any clue as to how to make a Linux Mint 12 USB drive that starts with or has the option of going to better than 60 Hz refresh rates?
Thanks in advance.
Hey Ken,
I’m not too savvy on more than a basic setup for a bootable USB drive. However, I did have some resolution issues when I was playing around with Linux Mint 12RC in VirtualBox.
I came across this post and ended up using GRandR (sudo apt-get install grandr).
Boot from the USB drive or Live CD you’ve got and try installing the grandr package or any of those other packages. Use those tools to see if you can change the resolution and/or refresh rates. If you find success with that, the next step is to incorporate that package into the distribution. I’ve never done this before but I believe you can use remastersys to do it.
All this being said, why spend so much time using the Live distribution? You could install the distribution onto your USB drive and then your package installs will persist. You’ll have a bootable USB drive with the OS on it as if it were any other hard disk and not a Live CD.
Well, it wasn’t explicit but the implication from my first comment. since it was in an article about creating a live USB pendrive, was that it came up in 60 Hz mode as well. One of the changes that seems to have been made between Gnome 2 and Gnome 3 is that the monitor preferences screen has dropped the refresh rate option. I could make all sorts of disparaging remarks about the developers of Gnome 3 but they’d already been made.
Thanks for the pointer to the other article, I’ll see if it will help.
As for bootable distros on a thumb drive. I’m trying to create a châtelaine of them. One of the local shops had 4 gig thumb drives for a very good prive so I bought 6. These are mounted on a large ring to keep them together and they’ll eventually contain several different distros and various hardware and software manuals.
(Châtelaine is an old term introduced to me by my sister when I described what I was doing. It’s more than just the name of a magazine.)
I have a problem when installing Linux Mint 64bit DVD.
Unetbootin does not extract the iso file to the usb.
I found this:
http://community.linuxmint.com/tutorial/view/744
Very interesting brodul. I’m glad you posted the solution you found. Thanks.
Thanks a LOT! Cheers!
Followed the path with success, but then I thought, I’m only half way to where I would like to be. That is I have a LIVE system on a USB flash drive, which behaves exactly like a live CD. But what I need to now is INSTALL on another USB drive. And thsat I am having trouble with, not least because I am using a netbook with 1024 x 600 resolution, and a lot of the buttons in the install dialogue are off the bottom of the screen.
Followed the instruction and got a live system on a 4Gb pen drive: great. Now have worked out how to use this to install the full system from that drive onto another 16Gb pen drive. I noticed that to move a window in Mint you need to hold down Alt and F7. (Thinks it’s F11 on Ubuntu.) Anyway this allowed me to reveal crucial buttons during the install dialogue which were initially off the bottom of the bottom of the screen.
Was very impressed that the live system connected without problem to my wireless router, and that the install process offered to import my Ubuntu account from the hard disc.
Really glad I found this post: many thanks.
thanks! i just use my old craiglist laptop to test different systems on and stream netflix as its old as hell, but this usb thing allows me to have a faster computer. thanks again
Download distro iso of your choice run ImageWriter – bingo – a bootable usb drive
Does that mean, I get to boot Back Track 5 in a regular USB as long as it’s with the Linux operating system?
Hello,
I purchased Mandriva flash which is a “propietry” linux memory stick. It was great as I installed AVG Anti virus on it with ntfs-3g drivers and was able to clean malware infected Windows machines without having to unscrew harddrives etc.
I have found with imaging live distributions onto memory sticks (I’ve tried a few SuSe live CD) using Unetbootin or dd or whatever works…. but just like a CD there is no writable partition…. All edits are stored in memory and apon reboot one looses all their programs they have installed. Because the stick has been image level copied from CD fdisk/gparted or what ever can’t add a secondary writable partition to store additional programs.
Wondering if you have found a distribution/image/method that allows for a secondary partition on the memory stick to be mounted after boot – and that is pesistent after reboot?
Worked flawlessly. Fantastic! Thanks Colin.
Will this work with Windows 8 (Sony Vaio T-Series)?