I want to put this post into the category of, “Holy crap! I didn’t know I could do this in Xcode!” For years I’ve dealt with creating custom header views for UITableViews purely in code and only recently found a much easier way to create them using storyboards and Interface Builder. I know, many developers dislike working with Interface Builder and Storyboards and prefer to work in code. Good for them. I like to work with storyboards and I like to visually design my interfaces. If you are like me, read on to learn a new way to design custom UITableView headers and footers using storyboards.
Why Create a Custom Header or Footer View?
First off, I want to address the question, “Why would I want to create custom header or footer views for a UITableView?” In the various apps I have created, I’ve often found that I want to put more text into the header than a simple title. The easiest way of putting text into a header or footer view is to implement the tableView:titleForHeaderInSection: or tableview:titleForFooterInSection:. Simply return a string and it will be displayed in the appropriate header or footer section. This is fine for times when I am sticking with the stock look of a UITableView and only want to display a title, but I often find myself wanting to display more than just a single string or wanting to change the background image or color, or the size and style of the text in the header. To accomplish these things, I need to implement custom header views.
Up until recently, when I’ve wanted to create custom headers or footers I’ve always implemented the tableView:viewForHeaderInSection: method with code like this:
-(UIView*)tableView:(UITableView *)tableView viewForHeaderInSection:(NSInteger)section
{
// 1. The view for the header
UIView* headerView = [[UIView alloc] initWithFrame:CGRectMake(0, 0, tableView.frame.size.width, 22)];
// 2. Set a custom background color and a border
headerView.backgroundColor = [UIColor colorWithWhite:0.5f alpha:1.0f];
headerView.layer.borderColor = [UIColor colorWithWhite:0.5 alpha:1.0].CGColor;
headerView.layer.borderWidth = 1.0;
// 3. Add a label
UILabel* headerLabel = [[UILabel alloc] init];
headerLabel.frame = CGRectMake(5, 2, tableView.frame.size.width - 5, 18);
headerLabel.backgroundColor = [UIColor clearColor];
headerLabel.textColor = [UIColor whiteColor];
headerLabel.font = [UIFont boldSystemFontOfSize:16.0];
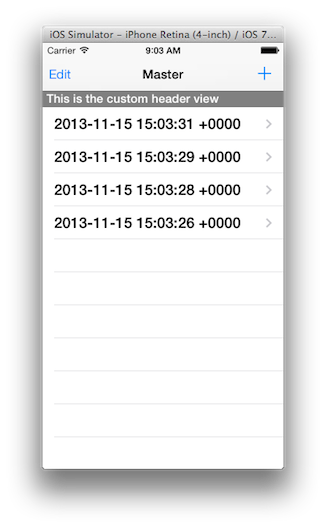
headerLabel.text = @"This is the custom header view";
headerLabel.textAlignment = NSTextAlignmentLeft;
// 4. Add the label to the header view
[headerView addSubview:headerLabel];
// 5. Finally return
return headerView;
}
In 1, I create the UIView I want to use as the header view. I’m keeping the height of the header view (22 points) the same size as the default height of a UITableView header. If I wanted the header to be larger, I would use a larger CGRect, but would then also have to implement the tableView:heightForHeaderInSection: method to return the custom height. In 2, I set a custom background color for the view. Depending on the situation, I would set other properties of the header view here as well. In 3, I create the UILabel that will be used as the text in the header. In this case, I want the text to be a different size and color from the default so I set those properties here as well. If I want additional labels or other items such as an image I would have to create them here too. In 4 I add the UILabel created in 3 to the header view along with any other subviews I want added. Finally in step 5, I return the newly created header view. This creates a custom header view that looks like the following:
I always felt that was a lot of work just to customize a header view for a UITableView. The more complex the header view I wanted, the more code I had to write. (And I know that the more code I have to write the more opportunities I have to make a mistake.) Creating the header views this way also required me to hand-code positions or to define constraints to the various elements by hand. Again, too many opportunities for me to make a mistake. I wanted a better way and I think I’ve found one.
The New Way
I have to be honest, this isn’t my invention. I did not come up with this on my own. Recently while searching for something else, I stumbled upon this solution on Stack Overflow (http://stackoverflow.com/questions/9219234/how-to-implement-custom-table-view-section-headers-and-footers-with-storyboard). When I read that post I thought, “Holy crap! I can do that?!?” Upon further investigation I found that I really could do just that and was thrilled. Suddenly all the code I had previously written for my custom header views was rendered obsolete in the face of this new method. So, even though I did not develop this solution on my own, I wanted to share it as much as I can. Here is what I now do to create my custom header views.
The first thing I do is create a custom UITableViewCell subclass to use for my custom headers, just like I would do for any other custom tableview cell. I create the new class and add the UILabels or other views I want as IBOutlets. Here is the header file for such a class:
@interface CustomHeaderCell : UITableViewCell

@property (nonatomic, weak) IBOutlet UILabel* title;
@property (nonatomic, weak) IBOutlet UILabel* subtitle;
@property (nonatomic, weak) IBOutlet UIImageView* image;

@end
Next, on the storyboard, I select my tableview and add a new prototype cell from the Attributes Inspector and give that new prototype cell a unique reuse identifier. In the picture below, I’ve used “HeaderCell” as my reuse identifier and added the UILabels for the title and subtitle as well as a UIImageView. I’ve also colored the cell’s background blue and adjusted the height to fit. All of this is pretty standard steps for creating a custom UITableViewCell.
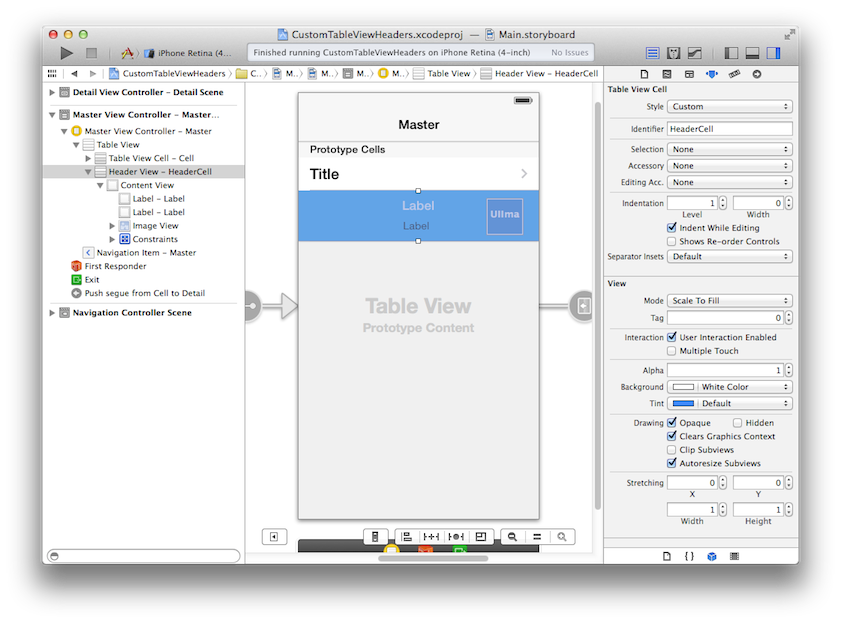
After creating the custom class and configuring the cell in the storyboard, the next step is for me to switch to the Identity Inspector and change the class of the custom cell to my CustomHeaderCell I declared previously. Once done, I hook up the various IBOutlets from the Connections Inspector.
The final step, is to use this new custom header cell in my code. Like before, I will implement the tableView:viewForHeaderInSection: method but this time I’ll make use of my custom header cell instead, like such:
-(CGFloat)tableView:(UITableView *)tableView heightForHeaderInSection:(NSInteger)section
{
return 68.0;
}
-(UIView*)tableView:(UITableView *)tableView viewForHeaderInSection:(NSInteger)section
{
// 1. Dequeue the custom header cell
CustomHeaderCell* headerCell = [tableView dequeueReusableCellWithIdentifier:@"HeaderCell"];
// 2. Set the various properties
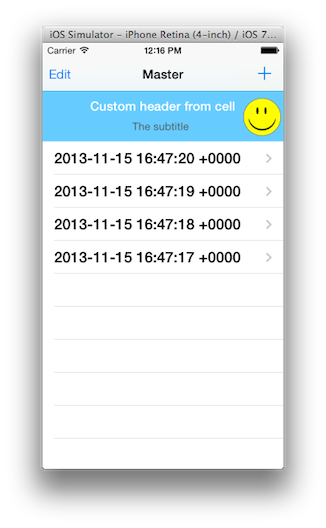
headerCell.title.text = @"Custom header from cell";
[headerCell.title sizeToFit];
headerCell.subtitle.text = @"The subtitle";
[headerCell.subtitle sizeToFit];
headerCell.image.image = [UIImage imageNamed:@"smiley-face"];
// 3. And return
return headercell;
}
Compare the code above where I set a custom title, subtitle and an image in the custom header view to the earlier code where I create and insert just a single UILabel. Less code, fewer mistakes. Notice the implementation of the tableView:heightForHeaderInSection method. Since my custom header cell is not the standard height of a header view, I must implement this method as well otherwise the header cells will be displayed at the default height of 22 points and all the custom goodness will be truncated. This is true even when I use my old method. I just did not do that in the previous example. When this code runs, I see the following:
A Modern Alternative
In researching this blog post I learned something else new. As of iOS 6, (I’m behind the times here) Apple introduced a few new methods for dealing with header and footer views in UITableViews. There is now a headerViewForSeciton: and footerViewForSection: that return UITableViewHeaderFooterView objects. There are also methods for registering nibs or classes for header and footer views as well as a method for dequeuing a HeaderFooterView for a given section. It appears that these methods all do just what I described above but for headers and footers. I admit I have not fully explored these new (to me) methods and perhaps I will do so for a future blog post.
In the meanwhile, I will continue to use my new-found method for creating and configuring custom header and footer view. I can already tell that I like this method much more than the old way I used to use. I hope someone finds this post useful.
Take care,
Jim